搭建 hexo+github+next 主题博客
博客介绍
博客预览地址:https://theme-next.js.org/
搭建博客
GitHub:https://github.com/next-theme/theme-next-docs
在本地安装:
git clone https://github.com/next-theme/theme-next-docs
cd theme-next-docs
npm install
生成:
npx hexo generate运行:
npx hexo server博客主题
GitHub:https://github.com/next-theme/hexo-theme-next
发布到 github.io
在 hexo 下的_config.yml 文件中配置:
deploy:
  type: git
  repository: git@github.com:Jueee/jueee.github.io.git
  branch: master
安装插件:
npm install hexo-deployer-git --save打开你的 git bash,输入 hexo d 就会将本次有改动的代码全部提交,没有改动的不会:
$ npx hexo g -d【注】部署这个命令一定要用 git bash,否则会提示 Permission denied (publickey).
此时,会在项目中生成 .deploy_git 文件夹。
打开 git bash,切换到 hexo/.deploy_git,执行
git init再绑定远程仓库
git remote add origin git@github.com:jueee/jueee.github.io.git回到 cmd 命令行
$ npx hexo g -d搞定了,成功提交了正确的博客内容。
常用 hexo 命令
常见命令
hexo new "postName" #新建文章
hexo new page "pageName" #新建页面
hexo generate #生成静态页面至public目录
hexo server #开启预览访问端口(默认端口4000,'ctrl + c'关闭server)
hexo deploy #部署到GitHub
hexo help  # 查看帮助
hexo version  #查看Hexo的版本
缩写:
hexo n == hexo new
hexo g == hexo generate
hexo s == hexo server
hexo d == hexo deploy
组合命令:
hexo s -g #生成并本地预览
hexo d -g #生成并上传
问题处理
问题一:
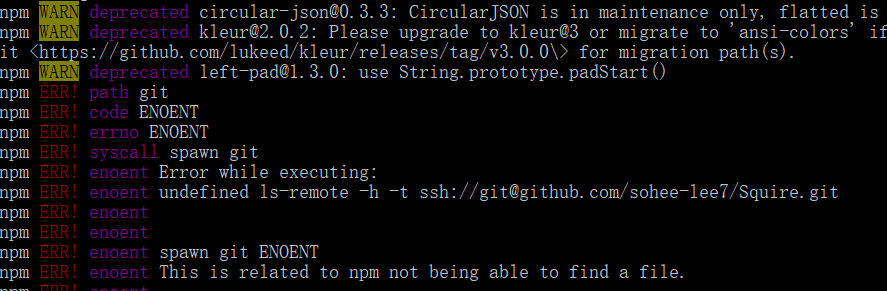
解决方法:
配置 git 环境变量,将 C:\Program Files\Git\cmd(具体根据 git 安装目录)添加到系统变量 path 中
问题二:
PS E:\code\GitHub\Jueee\jueee-blog> npx hexo clean
(node:44956) ExperimentalWarning: The fs.promises API is experimental
ERROR { err:
   E:\code\GitHub\Jueee\jueee-blog\node_modules\hexo-theme-next\package.json:2
     "_from": "hexo-theme-next@8.0.0-rc.5",
查看 node 版本
node -v
v10.16.0
npm -v
6.9.0
需要升级 node 到最新版。
下载地址:https://nodejs.org/zh-cn/download/
相关文章