Spring Boot+Vue 前后端分离开发实例
项目说明
本项目基于 SpringBoot 和 Vue,搭建一个前后端分离项目的 demo。
主要效果是通过前后端分离,将 MySQL 数据库中的数据,展示显示在页面上。
基础依赖:
- 数据库存储:MySQL
- 前端项目:Vue
- 后端项目:springboot
创建 SpringBoot 后端项目
使用 idea 的 Spring Assistant 插件 创建项目:
- Developer Tools:Lombok
- Web:Spring Web
- SQL:Spring Data JPA、MySQL Driver
创建 vue 前端项目
创建项目
vue init webpack-simple booktest运行项目
cd booktest
cnpm install vue -g
cnpm run dev
编写 SpringBoot 后端接口
代码文件
配置文件
spring:
  datasource:
    url: jdbc:mysql://localhost:3306/vuedb?useUnicode=true&characterEncoding=UTF-8&serverTimezone=Asia/Shanghai
    username: root
    password: jue
    driver-class-name: com.mysql.cj.jdbc.Driver
  jpa:
    show-sql: true # 日志打印 SQL
    properties:
      hibernate:
        format_sql: true # 格式化日志 SQL
server:
  port: 8181
Bean
@Entity
@Data
public class Book {
    @Id
    @GeneratedValue(strategy = GenerationType.IDENTITY)
    private Integer id;
    private String name;
    private String author;
}
DAO
public interface BookDAO extends JpaRepository<Book,Integer> {

}
Controller
@RestController
@RequestMapping("/book")
public class BookController {

    @Autowired
    private BookDAO bookRepository;

    @GetMapping("/books")
    public List<Book> findAll(){
        return bookRepository.findAll();
    }
}
测试类
@SpringBootTest
public class BookControllerTest {

    @Autowired
    private BookDAO repository;

    @Test
    void books(){
        List<Book> bookList = repository.findAll();
        System.out.println(bookList);
    }
}
执行打印结果:
[Book (id=1, name = 解忧杂货店,author = 东野圭吾), Book (id=2, name = 追风筝的人,author = 卡勒德・胡赛尼)]
接口验证
访问接口:http://localhost:8181/book/books

编写 vue 前端项目
代码文件
修改 App.vue:
<template>
<div id="app">
<table>
<tr>
<td>编号</td>
<td>书名</td>
<td>作者</td>
</tr>
<tr v-for="item in books">
<td>{{item.id}}</td>
<td>{{item.name}}</td>
<td>{{item.author}}</td>
</tr>
</table>
</div>
</template>
<script>
export default {
name: 'app',
data () {
return {
books: [
{
id:1,
name:"test1",
author:"author1"
},
{
id:2,
name:"test2",
author:"author2"
},
{
id:3,
name:"test3",
author:"author3"
}
]
}
}
}
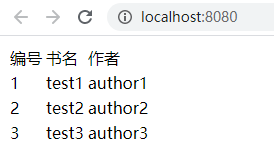
</script>访问验证
访问地址:http://localhost:8080/
结果如下:
前后端数据同步
添加 axios
安装 axios
npm install axios --save在 main.js 配置
import axios from 'axios'
Vue.prototype.$axios = axios
修改 App.vue
<script>
export default {
  name: 'app',
  data () {
    return ...
  },
  created(){
    this.$axios.get('http://localhost:8181/book/books').then(function(resp){
      console.log(resp)
    })
  }
}
</script>此时访问:http://localhost:8080/,前端报错:
Access to XMLHttpRequest at 'http://localhost:8181/book/books' from origin 'http://localhost:8080' has been blocked by CORS policy: No 'Access-Control-Allow-Origin' header is present on the requested resource.
这是由于 跨域问题
什么是跨域?
当一个请求 url 的协议、域名、端口三者之间任意一个与当前页面 url 不同即为跨域!
解决跨域问题
后端新增 Java 类并重新启动:
import org.springframework.context.annotation.Configuration;
import org.springframework.web.servlet.config.annotation.CorsRegistry;
import org.springframework.web.servlet.config.annotation.WebMvcConfigurer;

@Configuration
public class CrosConfig implements WebMvcConfigurer {

    @Override
    public void addCorsMappings(CorsRegistry registry) {
        registry.addMapping("/**")
                .allowedOrigins("*")
                .allowedMethods("GET", "HEAD", "POST", "PUT", "DELETE", "OPTIONS")
                .allowCredentials(true)
                .maxAge(3600)
                .allowedHeaders("*");
    }
}
此时,跨域问题解决。
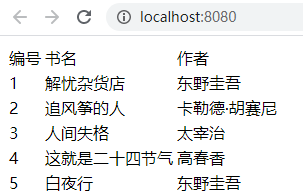
再次访问:http://localhost:8080/,前端打印如下所示:

展示后端数据
再次修改 App.vue
created(){
  var _this = this
  this.$axios.get('http://localhost:8181/book/books/').then(function(resp){
    _this.books=resp.data
  })
}再次访问:http://localhost:8080/,显示如下: